


Mato & Hash Blog
Sunday School Crafts to Keep Kids Engaged and Entertained
READ TIME: 9 MINUTES
Written by Olivia Beelby | Photography by Leona Flowers
At Mato & Hash we’ve worked with a variety of churches throughout our time as an apparel provider and printing shop. There’s no shortage of activities a church may need special t-shirts or gift bags for, and this extends to their congregations as well. The year is typically peppered with camp outings, day trips, youth group meetings, charity events, and the like. However, in a time where churches, schools, and even individuals aren’t gathering for some of their favorite activities, many parents are left wondering how to keep their children occupied, engaged, and in touch with their religious values. Considering these gaps in children’s regular enrichment and our faithfulness to the local Christian community we’ve decided to compile a list of kid-approved Sunday School Crafts that can easily be adapted to convey the biblical messages your child is craving. This is an opportunity to get creative and have some fun with Bible School Crafts for kids! While we've laid out suggested materials for each craft, don't hesitate to substitute with whatever materials you have around the house.

Tie Dye Cross

Materials: Light colored clothing, fabric reactive dye, rubber bands or twine, marker, paper, garbage bags/plastic
This Sunday School crafts project is perfect for those of us with old clothes, linens, or other fabric pieces laying around waiting to be transformed. It's also a fun way to customize new clothes. Tie dyeing a cross pattern is surprisingly easy and creates a beautiful visual metaphor for children on how the light of God shines through everything, even the things we don’t pay attention to or might not consider beautiful.
Tie dyeing old clothes can also be a fun way for kids to see how different fabric colors and types may react to the dyeing process. You could even make an effort to do this project on a range of fabrics or colors to compare the effects of the dye, for an academic element.
Check out our video above on how to do this tie dye pattern. The basic idea is to fold whatever you’re dyeing in half and, tracing a paper cutout or going freehand, drawing half of a cross in washable marker on the place you’d like your design to be. Then, fold accordion style along the marker lines so that the folds line up into a straight line.
For the area of your piece not containing the cross design the world is your oyster; make swirls, scrunches, or extra folds for an unpredictable result. Secure the cross folds along the marker line and any other folds with twine or rubber bands and proceed to apply your dye!  Make sure you're either leaving the cross end of your piece blank or using two contrasting dye colors for the inside and outside of the design. Like most tie dye processes you’ll then let your pieces marinate for 24 hours. On the next day rinse excess dye and run your projects through the washer & dryer with like colors together. Let your kids do this part too to really feel the fruits of their labor when they get to wear their awesome tie-dyed cross apparel!
 Make sure you're either leaving the cross end of your piece blank or using two contrasting dye colors for the inside and outside of the design. Like most tie dye processes you’ll then let your pieces marinate for 24 hours. On the next day rinse excess dye and run your projects through the washer & dryer with like colors together. Let your kids do this part too to really feel the fruits of their labor when they get to wear their awesome tie-dyed cross apparel!
Origami Noah’s Arc Sunday School Crafts Activity

Materials: Construction paper, hard work surface, markers or crayons, scissors
For those looking to work on fine motor skills or with children already adept in this area, origami Sunday School Crafts is a relaxing and educational Bible School Crafts for kids with many applications and only a few simple materials. One great activity involving origami is to recreate the story of the great flood and Noah’s Arc. All you really need are some sheets of multicolored construction paper, something many parents already have! If you find yourself without this however, scribbled pieces of regular printer paper also create a cool result.
 Noah’s Arc. All you really need are some sheets of multicolored construction paper, something many parents already have! If you find yourself without this however, scribbled pieces of regular printer paper also create a cool result.
Origami boats are relatively simple to make, and can then be filled with an assortment of origami animals according to your child’s interests, what animals you see locally, or just what  instructions you can find online. Making two of each animal is also a good way for your child to practice learning from instructions. They'll be able to see that repetition makes tasks easier and provides a better result.

The resulting boat and animals can be used for endless play reenacting the arc sailing a flooded Earth. One could even use laminated paper or sheets of easily foldable plastic to create a waterproof version of the craft for water play in the tub or a pond or stream (making sure to pick up any animals potentially left behind).  For those daunted by the idea of creating tens of tiny folded paper animals, focusing on creating the arc is also great fun. The arc can be filled with cut out animal shapes or perhaps just let your child draw an array of animals on the finished boat. Whatever methods suit your family, the result is an engaging Sunday School Crafts opportunity great for refining motor skills and visualizing a biblical story.
 For those daunted by the idea of creating tens of tiny folded paper animals, focusing on creating the arc is also great fun. The arc can be filled with cut out animal shapes or perhaps just let your child draw an array of animals on the finished boat. Whatever methods suit your family, the result is an engaging Sunday School Crafts opportunity great for refining motor skills and visualizing a biblical story.
Homemade Air Dry Clay: Fruits of the Spirit

Materials: 1/2 cup corn starch, 1/2 cup white glue, 2 TBSP neutral oil, 1 TBSP lemon juice, food coloring, miscellaneous crafting materials
Depending on what you have in your home this Sunday School Crafts activity can be done quickly and with little preparation. The recipe is exact however, meaning that if you don't have some of these materials you'll have to go out and get them. Check out our video below for the recipe and instructions on how to make the air dry clay. This activity touches on elements of the slime craze — kids will be able to mix a transforming goop, adding in their favorite colors and decorations — while actually creating a lasting result. Check out our video below for the recipe and instructions.
The idea is for your child to create 9 fruit charms. These fruits represent the nine fruits of the spirit from Galatians 5:22-23- love, joy, peace, forbearance, kindness, goodness, faithfulness, gentleness and self-control. It's a great Bible Craft for kids to think about how these principles are represented in the simplest things in their lives, like types of fruit! They’ll need a few different colors of clay depending on what fruits they’re planning on making, so be sure to make a plan with them and provide a few separate containers, perhaps Tupperware or paper cups. Or you could simply leave the "clay" white and paint them later. For decoration things like beads, glitter, or other tokens make great embellishment as seeds, dew, or leaves. As usual, let your kids get creative!
The beauty of fruits is that they come in so many different shapes and colors, nearly anything your child makes will be perfect. After they're done decorating simply let them sit out and, as the name  implies, dry in the open air. The resulting tiny hard tokens can be converted into charms on a necklace or bracelet (best if holes were made before drying for this purpose) or kept in a pouch to keep in one’s pocket or room as a lasting reminder of these principles. Making an additional charm with the verse reference or a decorative tag for the bag is a sure-fire way to aid kids in making this connection.
 implies, dry in the open air. The resulting tiny hard tokens can be converted into charms on a necklace or bracelet (best if holes were made before drying for this purpose) or kept in a pouch to keep in one’s pocket or room as a lasting reminder of these principles. Making an additional charm with the verse reference or a decorative tag for the bag is a sure-fire way to aid kids in making this connection.
Sock Puppet Biblical Theater Sunday School Crafts

Materials: Tube/crew socks, googly eyes, super or hot glue, scissors, craft and fabric scraps (get creative!)

This Bible craft for kids is fun for obvious reasons. Who doesn’t love making sock puppets, let alone putting on a show with them! The transformation aspect is endlessly entertaining. In this activity children can really flex their creative muscles as well as their comprehension skills. They can also transform cardboard boxes into a stage for their eventual puppet shows. It’s a great activity for groups of children with differing interests, as everyone will be able to find their part in the production.
The only necessary element of this craft are the socks. Everything else can be adapted using whatever materials you have laying around. Old clothes  can be cut up to make clothes and hair. Straws, cotton buds, or popsicle sticks can be glued on for arms. And while googly eyes add the ultimate fun touch, eyes can also be easily made from paper or simply drawn onto the sock.
 can be cut up to make clothes and hair. Straws, cotton buds, or popsicle sticks can be glued on for arms. And while googly eyes add the ultimate fun touch, eyes can also be easily made from paper or simply drawn onto the sock.
Shows can center around different stories and verses from the bible, or let your little one’s imaginations run wild creating their own screenplays exploring a specific virtue or message from a verse. This activity encourages children to incorporate their own ideas about what these stories and characters could look like, as well as how they can be told.
Encouraging children to look at the bible through their own  understanding is a sure way to get them to personally identify with the messages and carry them throughout their lives. Perhaps my favorite part, this craft creates toys and an activity for your children to return to and explore as they’re introduced to new scripture and as they grow as people through the Bible.
 understanding is a sure way to get them to personally identify with the messages and carry them throughout their lives. Perhaps my favorite part, this craft creates toys and an activity for your children to return to and explore as they’re introduced to new scripture and as they grow as people through the Bible.
Sword of the Spirit
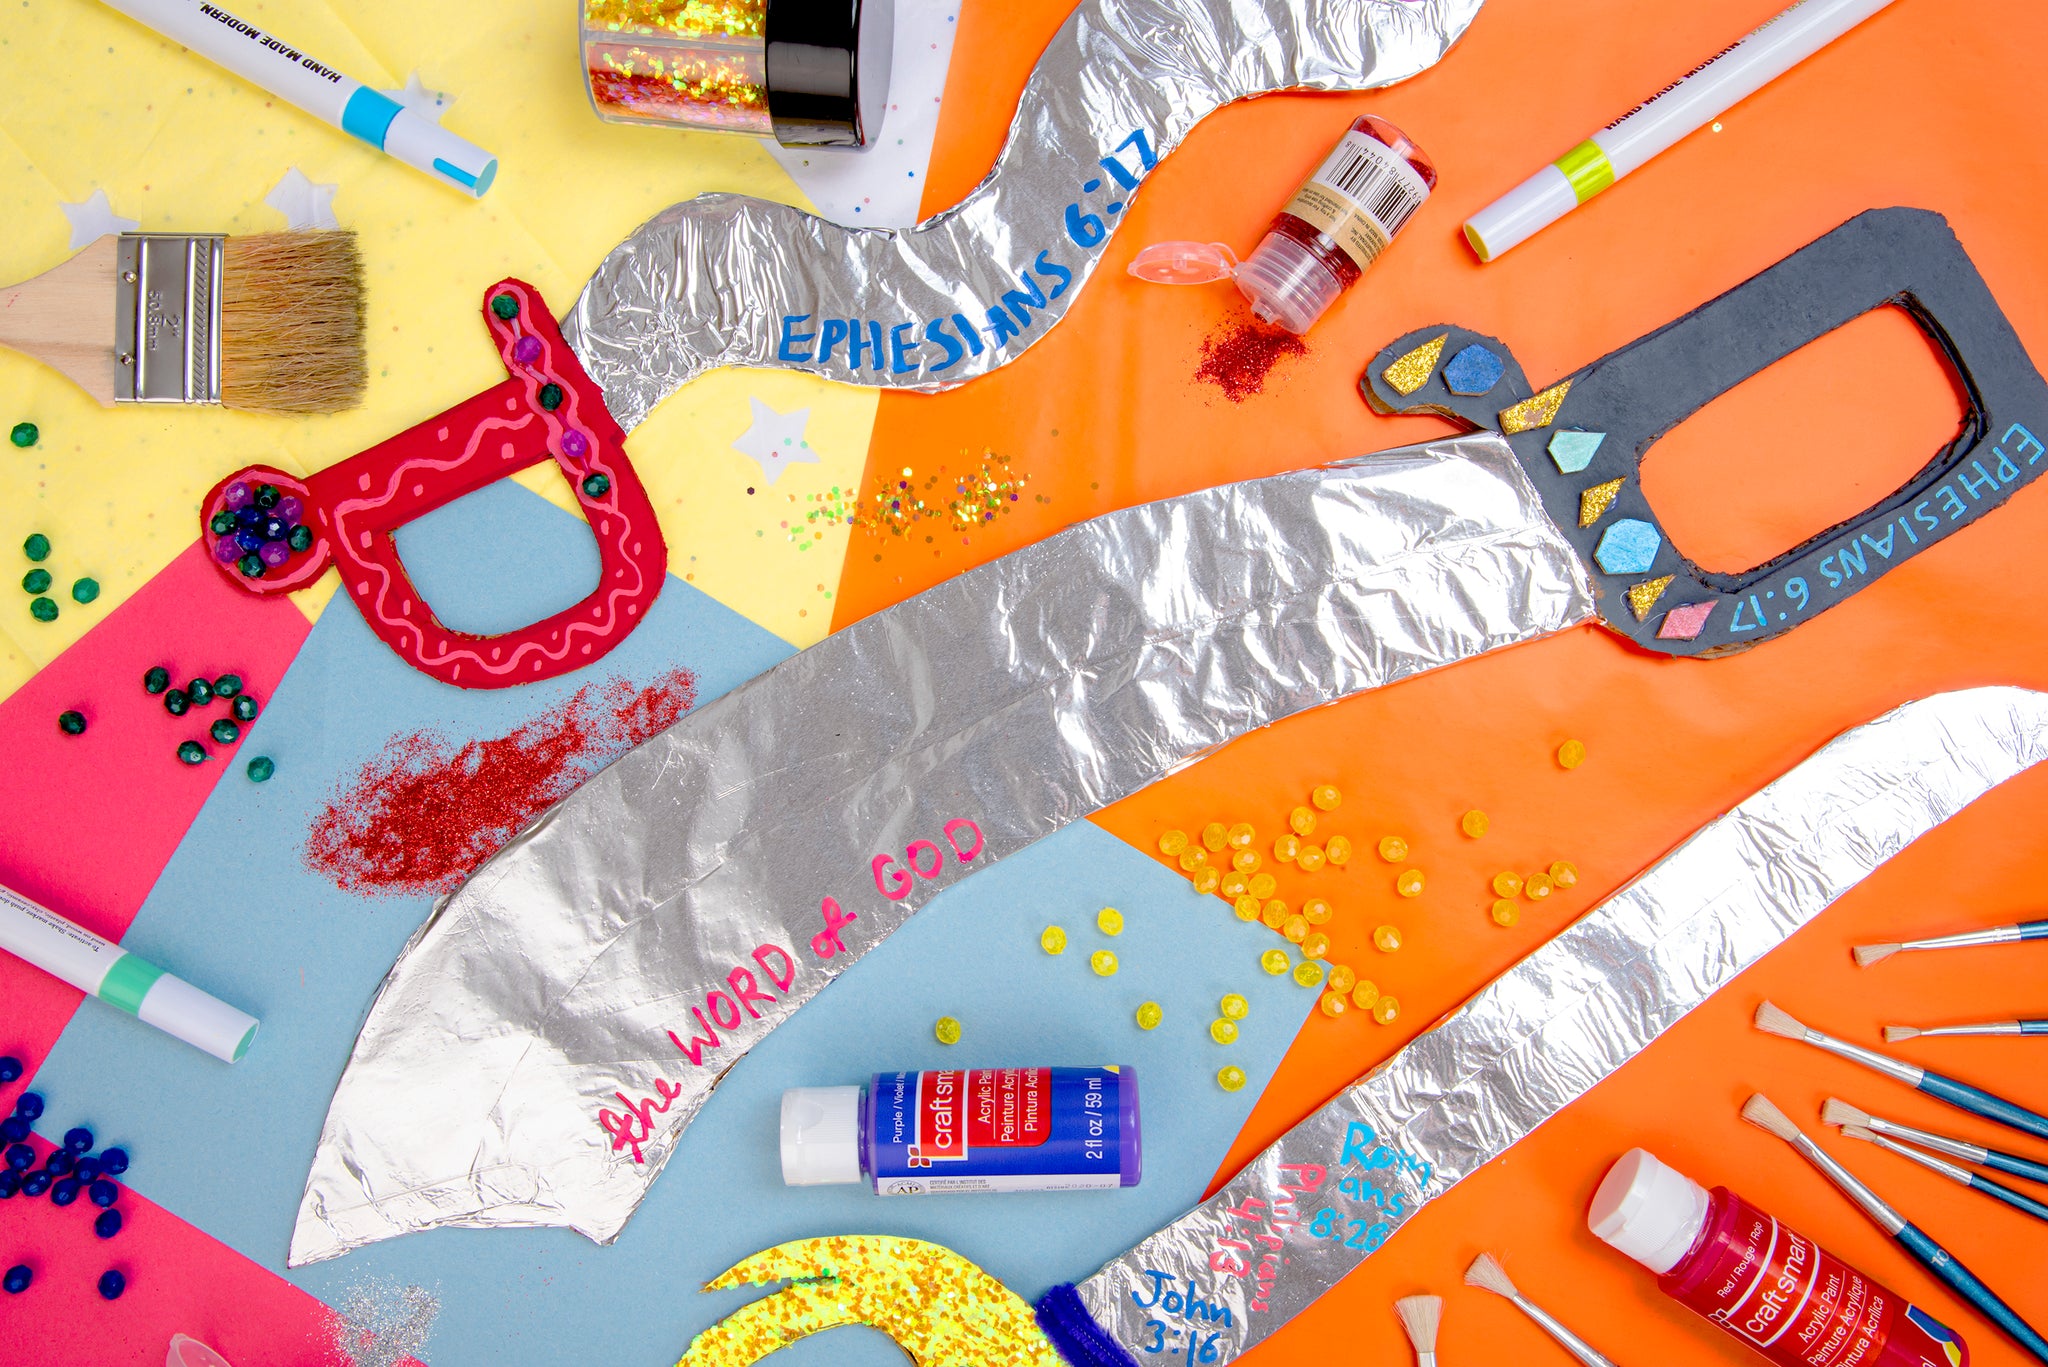
Materials: Cardboard, tin foil, box cutter or xacto knife, clear tape or glue, scissors, paint, markers, stickers, miscellaneous crafting bobbles
Akin to a popular biblical visualization for children, putting on the armor of god, this Sunday School Crafts project encourages kids to create toys for themselves that speaks to biblical themes and values. One of these pieces of armor is the sword of the spirit. In Ephesians 6:17 we’re directed to “Take...the sword of the spirit, which is the word of God”. This craft emboldens children to think valiantly through the word of God — to imagine biblical texts as a tool for cutting to the core of all information presented to them. There are a variety of tutorials online for making cardboard and tinfoil swords, use whichever one suits your methods and materials.
We made our swords somewhat differently from any videos we could find. First, draw a sword shape onto a piece of cardboard, the key  features of which being the blade, handle, and hand guard. The shapes are totally kid's choice! Big, small, thin, thick, curved, straight — whatever they feel suits them best. Look up some swords from different eras to emulate for that academic touch. Think of the handle as extending down from the center of the blade and the guard going around where your fingers will be. Then cut this piece out of the cardboard with your box cutter or xacto knife. This part can be tricky, so monitor closely and provide assistance where needed.
 features of which being the blade, handle, and hand guard. The shapes are totally kid's choice!
 Then, we recommend decorating your handle and hand guard. This is where those markers and paint will come in handy, or you could use decorative paper. This is another area where creativity is key. Apply sticker, glue on beads or gems, paint swirls and stars. Let your children channel their inspiration into the sword.
After the handle is decorated how you'd like it go ahead and wrap the blade of your sword in tin foil. Lay a piece at least three times wider than your blade shiny side down on a flat surface.  Then position the blade of your sword in the middle of the foil. Make sure the bottom of the foil is where you'd like your blade to end. The edges of the foil can then be ripped into strips — whatever size is needed to fit the shape of your sword — and wrapped around the blade. Secure with glue or clear tape.
 Then position the blade of your sword in the middle of the foil. Make sure the bottom of the foil is where you'd like your blade to end. The edges of the foil can then be ripped into strips
 Lastly, add some finishing touches to the sword. You can write the verse containing the sword of the spirit reference, Ephesians 6:17, somewhere large and bold on your sword as a reminder. You could also decorate the blade with some of your personal favorite verse references. Anything that you or your child finds inspiring.
Garden of Eden Terrarium Sunday School Crafts

Materials: Glass container with lid, pebbles/gravel/marbles, mesh/screen, dirt, moss, plants suited to terrarium life, decorative extras
There’s no better way to acquaint yourself with God’s beauty than creating your own miniature garden Sunday School Crafts. God creates everything in his image, and it’s surprisingly easy to create a terrarium in your own. A terrarium is a garden enclosed in a glass container. Think aquarium, but instead of “aqua” (water), it’s “terra” (land). Like most of our other suggested projects this craft can easily be scaled based on the dexterity and interest level of your little ones.
Old jars work great as the container for your garden, as do empty candles! Really anything glass with a lid will do. The lid will help to keep moisture inside the terrarium so the plants inside will never need to be watered. The terrariums become their own ecosystems! You could also go to a Sunday School Crafts store to purchase something more decorative.
As for what will go inside, the options are up to you! Depending on where you live you may not need to purchase anything. You’ll be surprised how many local, native

plants thrive in a terrarium setting. This is a great way for kids to acquaint themselves with the natural world God has created around them. Take a walk outside and look for any moss or small ground cover plants. Ferns also work great in a terrarium, as well as succulent plants. If you want something a bit more glamorous, then a trip to your local plant nursery may be in order. Look for the same thing there— low light, small plants like ferns or succulents. An advantage to picking plants from the natural world is that they’re likely heartier than those carried in a nursery, so if you’re purchasing plants you may want to do a bit of extra research about their ideal conditions and care.
We ended up choosing an Echeveria “Black Prince” succulent and a Crassula Ovata “ET Fingers” succulent for our gardens. All of the moss is collected from outdoors.
If there are plants, then of course there must be soil! You’ll want to tailor the soil to whatever plants you plan on putting inside. Some plants need more drainage whereas others prefer a more moist mix. We used a cactus/succulent mix on account of the succulents we purchased, but you may not even need to buy any dirt! If you’re looking to build your terrarium from plant life you find outside, then the outside dirt will work just fine. Outside dirt is also a great option as it carries many of the micro-fauna (small animals) that can help a terrarium to really thrive. These micro-fauna do things like eat mold and fertilize the soil. Although small, they’re a vital aspect of God's lush ecosystem.
You’ll also need some small rocks to act as the drainage layer at the bottom of your terrarium. We’re simulating nature here, so this layer acts as the rock layer of the Earth or “crust”. We used decorative aquarium gravel, but you could also use small marbles or pebbles

found outside. Just make sure they’re small enough to lay flat at the bottom. On top of your drainage rocks we also recommend placing a piece of screen that’s been cut to fit the jar. This will help to keep your
dirt and rocks from mixing inside the terrarium. We were able to find charcoal coated screen in the home improvement section of our local big box store, which will add an extra purifying element to the draining water. Regular screen will work just fine though. With this in place you’ll have a perfectly simulated Garden of Eden with its own water cycle and drainage system.
When filling your terrarium, keep your drainage rocks to about an inch or two in height. You’ll want most of your space to be for the beautiful plant and moss life of course! Then go ahead and cut your screen using the container opening as a guide. Once the screen is placed go ahead and pour your dirt in. If you’re just using moss, which also makes a lovely terrarium, then you won’t need more than an inch or two of dirt. If you’re incorporating plants, however, you’ll want to make sure you have at least enough dirt to accommodate the root length of your plant. Groundcover sourced form outside may seem to have very long roots, but they can be spread horizontally through the dirt and will adjust to growing that way. You’ll probably want to un-pot any purchased plants before this step to really get a look at the plant's root system.
When adding purchased plants, make sure to not just plop the plant from the store’s pot into your terrarium. You’ll want to un-pot the plant, remove any excess soil (which can be used to level the terrarium as you place the plant), and very slowly and very gently loosen the plant’s root system. Often small plants in a nursery setting grow very tightly into their plastic pots, so to ensure they grow comfortably in your terrarium their roots need to be loosened. A spray bottle helps with this process if the roots are reeeeally tight, as water can be sprayed directly into the roots to flush out compacted dirt and help loosen them. Move carefully as you don’t want to rip the roots (although a bit of ripping isn’t likely to kill it). Remember that these plants are alive, also created in God’s image, so they deserve care and patience!

Plant your largest plants first and work down from there. Once they’re planted, cover the exposed soil in patches of moss for a really lush “Eden” look. You can also add your favorite rocks, marbles, figures, or toys! Whatever or whoever you want to live in your own Garden of Eden.
The last step is to thoroughly water your garden, spraying water onto the sides of the glass container to simultaneously wash away any debris and send water straight to the soil of your garden. Contrary to what we might think, many plants, especially succulents, don’t like to sit with water on their leaves. This can contribute to rot. So make sure you’re watering directly into the soil and onto the moss. If you know your plant of choice doesn’t like to be too moist, leave the cover off of your container for a few hours before closing the ecosystem. Otherwise you can close your container after watering. If you’re using an old jar, you may want to add some fabric and ribbon around the top to disguise the lid.

Then simply place on any surface like a table or bookshelf, near enough to a window according to the light needs of your plants.
You’ll want to check on the Sunday School Crafts terrarium occasionally to make sure all is going well, but other than that the maintenance is very low! The water you sprayed down the sides should continually evaporate and fall down the sides of the glass, keeping the garden alive and active. What a perfect system God has made!
Praise Instruments

Psalm 98:4-6- "Make a joyful noise to the Lord, all the earth; break forth into joyous song and sing praises! Sing praises to the Lord with the lyre, with the lyre and the sound of melody! With trumpets and the sound of the horn make a joyful noise before the King, the Lord!"
These two fun Sunday School Crafts encourage us to rejoice and praise the Lord through music! With these your family will be on the way to making your own Biblical band.
Lyre
 Materials: Cardboard, knife (box cutter or X-acto), rubber bands, popsicle sticks, hot glue, string, paint, decorative accents
This Sunday School Crafts task is a lot of fun. We encourage you to do the same!

You’ll need a scrap of cardboard, around 9x12 (but whatever you can make work), rubber bands (at least 3), hot glue, string, a box cutter or x-acto knife, and popsicle sticks. You’ll notice that in the video they use wooden dowels, but we were able to make it work with popsicle sticks and also found them easier to glue. Plus no cutting necessary! You can also decorate your lyre using whatever you have available. We used acrylic paint, beads, and glitter glue. Be creative!
Hint: Rubber Bands of the same thickness will be the most musical. Also, avoid cardboard with creases.
The first step is outlining your lyre shape on the cardboard. It can be as complicated or as simple as you like, as long as you’re comfortable cutting the design out. Little ones will definitely need help with this step. For a symmetrical design, fold a piece of paper in half and draw half of your lyre shape. You can reference classical shapes or create your own, just make sure it’s roughly as large as the paper and is solid at the bottom with an open space in the middle. Sort of an “L” from the crease of the paper—you can see this in our photos. Then, with the paper folded, cut the shape out and trace onto your cardboard unfolded. You’ll want the whole thing to look like a football goal, or like a head with horns, or an alien with tall eyes. You get the picture.

After cutting the lyre out you can paint it or add whatever other kinds of decorations you’d like. Perhaps while the base of your lyre is drying you can glue your popsicle sticks together. You’ll need 2 stacks of 4. One for the top- like the head of a guitar, to attach your strings to; and another on an angle at the bottom— like the fret of a guitar, keeping the strings from touching the base of the lyre giving them a better sound. The angle is an important aspect as well, as it will ensure each of your lyre strings are a different length thus producing a different tone. The effect is very satisfying! No need to be exact with this, simply attach one stack of sticks between the top “horns”, called arms, and another on an angle (approximately 45) on the thick base.
Next is time to mark out the holes for your strings. These will go under your “fret” popsicle stick stack at the bottom of the lyre, evenly spaced and placed so that they take up the open space between the lyre arms. Simply mark with an X where the holes will go and begin slowly working them out with your knife by repeatedly stabbing and wiggling into the X shape. We also added twine here for decorative flair.

You’ll then need to cut your rubber bands so that they’re just one rubber string and make thick knots at the very ends of them. We triple knotted ours. Then, from the back, feed your rubber band strings through the holes you’ve just created. The knot should be big enough to stop the strings from slipping through the holes. Stretch your string straight up the lyre to your top stack of popsicle sticks and tie the band around. Repeat until your lyre is fully strung.
(Hint: If you have issues with stability from the tension of the pulled rubber bands, like we did, glue some extra popsicle sticks along the back of your lyre arms.)
And voila! Your lyre is fully completed. You’ll notice upon plucking the strings that each will play a different note. It won’t be a perfect scale, and if your rubber bands are different thicknesses then this will impact their tone as well, but it is fun to hear a simple musical principle demonstrated so clearly with transformed household materials. All the better to strum your praises to the Lord!
Trumpet

Materials: Construction paper, cardboard tube, scissors, tape/glue, ruler, decorative accents
This next instrument is more about feeling than functionality. You’ll be creating a trumpet shape out of construction paper and a cardboard tube. It doesn’t make any noise on its own, but is a fine piece to sing through! For those of you without access to a printer, however, we’ve translated their template into a fairly easy to follow guide. To complete the craft you’ll need a cardboard tube, construction paper, clear or decorative tape or glue, scissors, and a ruler.

The first thing you’ll need is the cardboard tube. Perhaps stray away from using a toilet paper roll, as this is something children will be putting against their mouths. This is the ideal length however, so if you’re using a paper towel roll go ahead and cut it to roughly the size of a toilet paper roll. If that’s all you have available however simply disinfect beforehand. You’ll also need at least two pieces of construction paper in the color of your choice.
We went with yellow to emulate a classic gold trumpet, but your trumpet can be whatever color or colors you’d like! First, lay your tube lengthwise next to your paper, also lengthwise, and mark out this measurement. You’ll then cut a straight line across the paper from this distance. Wrap this piece of paper around the tube to magically transform it into the base of your glorious instrument. Secure with whatever you have available— glue (stick is probably best, or hot glue) or tape (whatever you don’t mind being visible. Clear tape is great, and is what we used, but you could also use decorative washi tape if you have any on hand).
The next step will be creating the flare of the trumpet. Fold your standard size construction paper in half horizontally or “hamburger” style. Then, reference our guide or the Tea Time Monkeys template for creating a perfect flare that will fit snugly around your trumpet’s base. Cut out the inside smaller curve carefully, making sure to cut toward the inside of your lines to ensure it’s not too tight on the tube.

The outside edge doesn’t matter as much and is only cosmetic, so it’s a perfect exercise for the kids. Once cut out, attach the two ends together and you’ll see a nice cone form. You’ll also want a handle for the trumpet, which is as simple as cutting out or folding a strip of construction paper and attaching it to the base. On one side of the base make a series of tiny slits all the way around. Then flare this edge out a bit. This creates a stop for the trumpet flare and allows for easier assembling. You’ll want to slide the flare on from the un-cut edge and fix in place with either your glue or tape.
Once all your parts are assembled together, base, horn, and handle, it’s time to decorate your Sunday School Crafts! Add three decorations at the top for buttons. We used pompoms but you could use stickers, dabs of glue, or paint to get the effect. As always, have fun with it and be creative. This is your trumpet and your song to God, so put your heart and soul into it.
Borax Crystal Charms

Materials: Borax, pipe cleaners, popsicle sticks, string, jar or cups, very hot/boiling water
God’s world is perfectly designed, with many beautiful secrets that seem like miracles to us. The magnificent nature of some minerals are truly mind blowing. One mineral in particular displays the beauty of God’s world and his love for us perfectly.
Borax, or sodium tetraborate decahydrate, has been in use in the US since deposits of the mineral were discovered in 1872. It acts as a household cleaning and laundry additive. It is NOT food safe or edible in any capacity, so definitely be present during this craft if you have curious eaters in your home. Similarly the mineral should not be inhaled or introduced to the eyes.

Borax is similar to salt in structure and, like salt, dissolves well in hot water. As the water cools, however, the borax molecules desire to leave the solution and re-form as solid crystals. This property is what we’re taking advantage of in this project.
To create borax crystal charms all you need are pipe cleaners, borax, hot water, a jar or other container, string, and popsicle sticks. First, create your favorite shape out of pipe cleaners. For an extra thick crystal you could also twist two pipe cleaners together and create your shape from that. The shape could be something that represents you and your interests, or a symbol from the Bible like a cross or a fish. Everything is a part of God’s world, however, so whatever you choose will be a testament to Him. Also remember that the borax crystals are translucent, so whatever colors you choose will be visible from within.
While your water is boiling, fix strings to the pipe cleaner shapes and tie them around a popsicle stick so that when the stick is rested over your container the shape dangles inside, NOT touching the sides or bottom.

The hotter your water is in the beginning the better your crystals will turn out, so boiling or just below boiling is ideal. We also found success after microwaving room temperature tap water for 3 minutes. Before creating your solution, place your containers somewhere they won’t be disturbed for the next 24 hours. Then, create your borax and water solution. We used 3 tablespoons of borax per 1 cup of water. If you find yourself needing more than 1 cup of water to submerge your shapes simply scale the recipe up. Then, stir the borax in until it is completely dissolved. As soon as you see it is dissolved, move your popsicle stick and pipe cleaner shape into place and afterwards DO NOT MOVE. Allow to rest in the solution overnight. Do not move the cup after you’ve placed your pipe cleaner shape, as any disturbance of your container will interfere with the crystal formation of the borax and result in smaller crystals.
When you return the next day, you should find that your flimsy pipe

cleaner sculptures have hardened into beautiful glistening gems. God’s love and spirit clings to us the same way, making us sparkling and resilient. Although it may not look like it at first, with time and patience we can grow into shimmering crystals by following Him.
Shaving Cream Heavens

Materials: Watercolor paper, shaving cream, acrylic paint, straight edge, tape, glitter, garbage bag
Genesis 1:1-31- "In the beginning, God created the heavens and the Earth"
Before creating the planet we call home, God created the heavens. You might know the heavens by a different name— space! In this craft you’ll create what you think the heavens look like. Like all good abstract art, it’s a messy process with a surprise ending and limitless room for improvisation. You’ll need thick paper, such as watercolor paper, classic foaming shaving cream, acrylic paint or ink, tape, and a ruler or some other hard straight edge. We used popsicle sticks. You can also add glitter and, for an extra special touch, put the finished piece in a frame for hanging.

To start, lay a garbage bag or other large sheet of plastic over your tabletop. This does get messy and it’s best to have something to contain that mess. Then, lay your piece of paper down on the table. You may want to add some tape pillows to the corners of your paper on the backside, as this craft involves smearing and scraping over the paper and it’s easiest when it stays put.
Next, lay a heavy layer of shaving cream over top of the paper. Pick a few paint colors to make up your universe. We recommend no more than 4, and ideally in the same color family, such as warm or cool. Begin dripping your paint into the shaving cream. Don’t be stingy! More paint will have more of an effect on the paper below. At the same time, don’t cover the surface entirely.

This works best with thin paint, so if the kind of acrylic you’re using is on the thicker side just thin it with some water. If you have it around, go ahead and add a few sprinkles of glitter on top for good measure.
Now to the fun part! With your hands, swirl the paint and shaving cream together, pressing down onto the paper as you do. Don’t swirl it too much, or you’ll end up with a mush of one color, but don’t be afraid to get in there and make sure all of the paint is pressed down. Once you’ve swirled your paint to perfection, take your ruler and scrape in one direction across the paper.
Voila! Your Sunday School Crafts painting is revealed! Messy as it may look, the heavens are their own perfect system created by God. You can sprinkle some extra glitter on top while it’s still wet if your first batch didn’t stick very well (like ours). For a lasting finish, throw the piece in a frame and hang it as a reminder of our vast universe!

And there you have it! Sunday school crafts that are easily tackled at home during these isolated times. Encouraging children to flex their creativity is essential in their engagement and education, and their connection to spirituality. If your looking for custom t-shirts or any custom embroidery for Sunday school crafts projects, feel free to reach out to us for assistance. We had tons of fun adapting these Sunday School Crafts projects and executing them, and hope that you've been inspired enough by some of our interpretations to try them at home! If you do end up replicating some of our crafts we'd love for you to share them on social media using the hashtag #MatoMoments so that we can check them out! If you have any questions or tips please don't hesitate to drop us a comment below. We'd love to know your thoughts! Thank you and congratulations, you've reached the end of the blog post!
 Olivia is a designer from the Detroit area who's been working at Mato & Hash for over a year now developing apparel designs and web content. She loves gardening, activism, and BLTs.
 Leona has been the resident photographer at Mato & Hash since the start of 2020, capturing flawless product images and actualizing breathtaking photoshoots. She loves her fur babies, hiking, and anything creative.